Homemade Basil Pesto

I may not have any Italian roots, but I sure love a heaping bowl of warm linguine with homemade basil pesto when the weather starts to cool down.  Sure, you could go out to your local grocery store and snag a jar of pesto that would be quite delicious, but the satisfaction and flavor that comes from creating your own, is irreplaceable.

I decided to focus today’s post on a simple, affordable, and traditional basil pesto recipe.  All of the ingredients needed that I will list below, are obtainable at most grocery stores, including Wegmans, Tops, and Walmart.  Shall we get started?

Here’s what you will need to make 1 cup of your very own basil pesto…

Ingredients:

  • 2 cups packed fresh basil leaves
  • 2 cloves garlic
  • 1/4 cup pine nuts
  • 2/3 cups extra-virgin olive oil, divided
  • Salt and freshly ground black pepper, to taste
  • 1/2 freshly grated Pecorino cheese

Each of these ingredients are quite simple and some might even be found in your pantry at home.  If you are unable to obtain pine nuts (they are sometimes a little pricey), feel free to substitute almonds, cashews, or walnuts.  Also, if your local grocery store just so happens to be lacking in the cheese department, substitute grated Parmesan cheese for the freshly grated Pecorino.

In terms of utensils, all you will need is:

  • Chopping knife
  • Cutting board
  • Medium size mixing bowl
  • Whisk

If you want to keep things simple, put aside the knifes and bowls, and substitute all of these utensils for a food processor.  If you choose to take this route, combine the garlic, basil, and pine nuts in the food processor and pulse until coarsely chopped.  Add 1/2 cup of the oil and continue to pulse until fully incorporated.  Sprinkle in your desired amount of salt and pepper.  If you are planning on utilizing the pesto immediately, add in the remaining oil and pulse until smooth.  Transfer to a serving bowl and stir in the cheese.

If you want to take a more old fashioned road of preparation, begin by finely mincing your garlic cloves and place in a medium sized bowl.  Finely chop the basil, almost to the point where it begins to form its own paste.  Combine with the garlic.  Lastly, finely chop the pine nuts to the desired size.  Mix together the garlic, basil and nuts, while also slowly incorporating the olive oil.  If you have a fresh block of Pecorino or Parmesan cheese, grate to the desired size into the bowl.  If your cheese is pre-grated, simply pour to combine with the garlic, basil, nut, and olive oil mixture.  Stir in the cheese and serve.

Typically, I enjoy putting my homemade pesto on linguine pasta (store bought, in the box.. no need to get fancy and make it yourself).  I also enjoy pesto on other types of pasta, ravioli, and even crostini toasts.  This simple dish is all you need to spice up a family dinner or wow your guests at a small gathering.

If you are not planning on using your pesto immediately, transfer to an air tight container or pour into ice cube trays, then place in a freezer bag.  You can freeze your pesto for up to 3 months.  I personally prefer freezing it in the ice cube trays because you can pop out a cube of pesto and it is the perfect amount for a single serving of pasta. 🙂

I hope you all enjoy this recipe and stay tuned for more coming your way soon!

Salmon with Lemon Herb Butter

Alright so this recipe may seem a tad more fancy than what I’ve posted before, but who doesn’t love a nice dinner every once in a while?  I know my roommates and I love sitting down together at the kitchen table and talk about our day’s while enjoying a delicious meal.  I’ve been slowly but surely becoming a salmon fan, so I have been dying to try and make my own.  I came across this recipe that combines lemon, garlic, herbs, and loads of butter to slather over a slow cooked, delicious salmon filet.  The best part is that this recipe is not only extremely simple, but very cheap and affordable.  As I’ve said before, I believe that everyone should EMBRACE SEAFOOD.  Don’t get freaked out by it until you give it a try first and I know that this is a recipe that you will be sure to love. 🙂

Ingredients: 

  • 1 stick butter, room temperature
  • 2 lemons, zested
  • 1/2 tbsp dried dill (or 1/2 bunch fresh, finely chopped dill)
  • 1/2 tbsp dried thyme (or 1/2 bunch fresh, finely chopped thyme)
  • 1 garlic clove, smashed and finely chopped
  • salt
  • 4 salmon fillets
  • Extra-virgin olive oil

Directions:

Begin by combining the butter, zest, herbs and garlic in a small bowl.  Stir until the butter mixture is evenly combined.  Season the mixture to taste, with salt.  This butter goes well with other meats and vegetables; therefore, if you have any leftover, don’t be afraid to wrap it up and save it in the fridge for later.

Bring your salmon fillets to room temperature.  Preheat a skillet on medium-low heat.  Coat the salmon fillets evenly with olive oil and then season with salt.  Drizzle olive oil into the skillet.  Place fillets (skin side down if applicable) into the preheated pan.  Cook the salmon for approximately 8 minutes, or until the translucent orange color turns into an opaque pink.  DO NOT FLIP!  It is important to leave the salmon on one side to prevent dryness and falling apart!  If you were to cook this salmon on a grill, you would preheat the grill on medium, brush oil on the grates, place fillets skin side down, cook approximately 8 minutes, and then flip cooking the other side for approximately 2 minutes.

Remove the fillets from the skillet when fully cooked.  Top with the room temperature butter mixture and watch as the hot salmon melts the butter, creating a sauce of sorts.  Serve your salmon immediately, maybe with a side of rice or pasta?  I also sliced up a few lemon wedges to garnish the plate and add as needed.  One of the worst tastes in my opinion, is overcooked salmon, so be sure to keep an eye on the color of the fish and the time as you are cooking it to prevent overcooking and dryness.  I personally loveeeeee this recipe and I really think you will too, so give it a shot and enjoy. 🙂

5 More Tips You Should Know

A few weeks ago I posted a list of simple, yet beneficial tips that are a “must” in the kitchen.  With finals just around the corner, I haven’t been able to cook as much as I would like to, so I figured I’d share a few more things you should know to ensure efficiency every time you are working your magic in the kitchen.

1. Do NOT Rinse Your Cooked Pasta

This is something that I feel like everyone has done at some point in their life.  After boiling a big pot of pasta, I know that it is almost human nature to want to just rinse it under some water after draining it into a colander.  By doing this, you are actually rinsing off all of the starches that we LOVE, leaving your pasta with less texture and nutrients.  If you are faced with the issue of pasta sticking together when left in the colander, try tossing it in some olive oil.  This will solve your problem and still leave your pasta tasting delicious.

2. Overcooking is Most Definitely the BIGGEST Cooking Mistake

BURNT FOOD IS NOT GOOD, but overcooked, tough food is also pretty terrible.  Overcooking vegetables makes them mushy, flavorless, and dull… overcooking meats makes them tough, dry, and chalky… overcooking grains makes them soggy and flimsy… None of this sounds appetizing, so it is essential that you learn to take food off the heat slightly before it is fully done and allow it to finish cooking simply by the internal temperature.  Also, do not be afraid to utilize a thermometer.  Yes these bulky things can be slightly off, but they will help you out much more than if you were to just “guess” whether or not your food is done.

3. Season Season Season

If your food tastes simply OK… it most likely needs some sort of seasoning.  A pinch of salt can go a very long way when it comes to making an OK dish, a great dish.  Yes, over salty food is not good, but under salted is even worse in my opinion.  If you have added your salt and the dish still seems a tad bland, try a splash of vinegar or something acidic to try and liven up your flavor.  You can also use acids, such as lemon, to help counteract any unwanted sweetness you may come across while cooking.  If food feels dry or sticky, you can also add a drizzle of olive oil.

4. Avoid Regular Large Onions

These big onions have a place in recipes such as stews, soups, roasts, etc., but they are unwelcome in more delicate and flavorful meals.  Onions have an extremely prominent flavor that can easily overpower any recipe, if not utilized correctly.  This is why I recommend sticking with smaller, lighter onions, such as shallots and leeks, to help enhance the dish, while also giving the other ingredients a chance to show their flavor.  Shallots have a sweeter, more delicate flavor, which is why they are one of my favorite ingredients to cook with when I come across a recipe that requires an onion.

5. Fruit Should NOT Be Stored in the Fridge

Most fruits are not intended to be stored in a cold environment, which is why you need to KEEP THEM OUT OF THE FRIDGE.  Most people believe that by doing this, they are prolonging their shelf life, but this is not the case.  Berries, such as strawberries, blueberries, and raspberries, should always be stored in the fridge; however, fruits like bananas, oranges, apples, uncut pineapple, and pears, should not.  Refrigerators actually dull the flavor of most produce, leaving them bland.  Extremely hot climates are an exception to this rule.

These are only a few more of the essential things one should know to ensure “optimal performance” in the kitchen.  I’ll be sure to post another 5 soon to help you all out. 🙂  Keep cooking and I have more recipes coming your way within the next week!


Shrimp Scampi Linguini

Seafood is my weakness.  Especially as the weather begins to warm up, there is nothing like digging my fork into a juicy piece of grilled salmon or dipping a steamed clam into some melted butter before popping it into my mouth.  Although seafood tends to scare many people off, whether it be due to the “oceany” smell, texture, etc., it is one of those categories of food where I believe that if it is cooked properly utilizing a delicious recipe, anyone can be won over.  The recipe I am about to share with you, is for a type of seafood that I can eat endlessly without ever getting tired of it.  Shrimp.  Shrimp is delicious no matter how it is prepared.  I personally love cold shrimp simply dipped in cocktail sauce; however, this recipe spices things up a bit.  In my opinion, everything is better when paired with some delicious pasta… so let’s get started because I’m starving!

Ingredients:

  • 1 pound linguini
  • 4 tablespoons butter
  • 4 tablespoons olive oil, plus a tad more for drizzling
  • 2 shallots, finely diced (if shallots are unavailable, about 1 tablespoon of a finely diced sweet onion will do)
  • 2 garlic cloves, minced
  • Pinch of red pepper flakes (optional)
  • 1 pound raw shrimp, peeled and deveined
  • salt and pepper
  • 1/2 cup dry white wine
  • Juice of 1 lemon
  • 1/4 cup finely chopped parsley leaves

Directions:

Alright, so you are going to want to start by throwing a pot of water on the stove to get boiling for your pasta.  When the water comes to a boil, add several tablespoons of salt and your pasta.  Stir to ensure all of the pasta separates, cover, and cook for about 6-8 minutes until the pasta is not 100% done.  Drain pasta and set aside.

In a large skillet on the stove, melt two tablespoons of butter in two tablespoons of olive oil over medium-high heat.Once combined together, saute the shallots, garlic, and red pepper flakes until the shallots are clear.  This should take about 3-4 minutes.  Season your raw shrimp with salt and pepper and then add them to the skillet.  Cook the shrimp until they have curled slightly and turned pink.  This should take approximately 2-5 minutes.  Try your best not to overcook your shrimp, for they will become extremely chewy and rubbery.  Remove the shrimp from the pan and set aside while keeping it warm.

To the skillet, add the white wine and lemon juice.  Once this reaches a boil, add 2 tablespoons of butter and 2 tablespoons of olive oil.  When the butter has melted, return the shrimp to the pan along with the chopped fresh parsley and cooked pasta.  Stir well to combine and season with salt and pepper.  Drizzle a tad more olive oil over the top and serve immediately!

As you can see, this recipe is quite simple.  There are hardly any ingredients or steps to follow, making this a recipe that ANYONE is capable of doing.  I also recommend serving this dinner with a nice side of garlic bread.  The two pair perfectly!  As I said before, I am a huge seafood fan, whereas a few of my housemates are not.  However, with some encouragement, I was able to convince them to give it a shot AND THEY LOVED IT.  This just goes to show that if something is cooked properly and seasoned well, it is very possibly to sway ones opinion, especially when it comes to seafood.  This recipe serves about 4-6 people, so don’t forget to double/half the ingredients if you are planning on serving a larger/smaller group of people!  Or just make all of it for yourself and have enough food to eat for a week, I support it because I know that I would do the same! 🙂

With that being said, I realize we are in college and on a budget, but this dinner was a cheap and affordable way to spice up my house’s dinner menu.  Also, if you enjoy this recipe and are interested in making more food from the ocean, stay tuned!  I’m planning on grilling up some salmon this week and I have a recipe that you will be SURE to love.

5 Kitchen Tips You Should Know

I haven’t been cooking too much lately, so I figured I’d change things up a bit and share with you all some awesome kitchen tips you definitely want to know.  What I find beneficial about this list of 5, is that there is a partial focus on how to keep foods fresher, longer.  As a college student on a budget, food going sour or bad is a waste of money; however, it can be easily avoided.  Several of these others tips are wonderful tools to help you remain efficient in the kitchen!

1. Use Tongs

Tongs are the universal tool of the kitchen.  Yes, a spatula is great for flat foods, such as pancakes and eggs, but tongs are much easier way to pick up other foods.  Tongs also give you much more control and a smaller chance of dropping your food across the kitchen floor.  Also, if you have non-stick cookware, I recommend using tongs with nylon tips to avoid scratching your pans.  Always go with the 12 inch tongs as well.  This long utensil keeps you far away from the heat and gives you sturdier control when picking up larger foods.

2. Store Everything in Tupperware

As a college student, Tupperware will save your life.  We all spend our limited amount of money on food, so for it to go bad before we are done utilizing as much as we can, is such a waste.  Tupperware gives berries, salad greens, and cut produce, a much longer life due to it’s air tight seal.  Don’t be afraid to also store your dinner leftovers in these containers as well.  If you make too much, pop it in a container and you’ll have a fresh and delicious meal waiting for you another day.  These containers are also reusable and therefore more Eco-friendly, which is ALWAYS a plus.

3. If You Own a Knife, Use It

Many people underestimate the versatility of an everyday kitchen knife.  In particular, I want to focus on garlic.  Pretty much all delicious recipes use garlic, so it is essential to know the proper way to mince and dice this tiny clove.  Many use a garlic press, however I find that to be a waste of time AND garlic.  Yes it seems easy, but half the time you are wasting some of your garlic as it gets stuck in the press.  A technique I prefer to utilize, is simply smashing the unpeeled clove with the flat side of your knife.  This will force the skin to slide off easily and then you can easily mince it up.

4. Keep Separate Cutting Boards for Different Foods

Certain foods, such as onions and garlic, have a very potent/prominent smell.  Many don’t realize how easy it is for these flavors to be permanently absorbed into a cutting board.  This being said, I find it very beneficial to have at least two different cutting boards to ensure that these flavors aren’t being spread around in an unwanted manner.  No one wants onion flavored fruits and cheeses all the time!  Also, having a separate board with a small lip around the sides, is good for cutting meats to ensure the juices and blood don’t pour off the board onto your counter tops.  This can also help prevent cross contamination.

5. Herbs Should Be Fresh and Green

With the exception of a few certain that are intended to be dry, such as bay leaves and oregano, herbs should be fresh, green, and beautiful.  Herbs are always better and more flavorful when they are bright and fresh.  Although they don’t last too long in the fridge, the result in flavor is most definitely worth it.  I always recommend using fresh chives, parsley, thyme, rosemary, dill, etc.  These herbs add brightness and a stronger depth of flavor to each of your recipes.  Yes, dried herbs are still delicious, but they do not have a long shelf life and also lack the flavor that most recipes call for.

If you were planning on using dried herbs, another tip would be to put the herbs in the palm of your hand and rub them between your fingers as you add them to your recipe.  This helps release the oils from the dried herbs, giving them more flavor.


Artichoke and Cheese Stuffed Mushrooms

My all time FAVORITE food is a mushroom.  I know a lot of you are probably like “ewwww, gross, fungus”, but NO you are wrong.  Mushrooms are a gift from the gods and for those of you who are mushroom fans, this is a recipe that you will be sure to love.  Another food that takes a close second to mushrooms, are artichokes.  Who doesn’t love a delicious cheesy artichoke dip?  This recipe basically takes mushroom caps and stuffs them with a cheesy artichoke mixture and then bakes them to perfection.  Although it may seem complicated, this recipe requires hardly any ingredients and steps to prepare.  Before you know it, you’ll be pulling these guys out of the oven and popping ’em into your mouth.  Let’s get started!

Ingredients:

  • 24 large white mushrooms
  • 1/4 cup olive oil, for drizzling
  • Salt and pepper
  • 2 cans sliced or quartered artichoke hearts
  • 2 cloves minced garlic (or about 1 tsp jarred minced garlic)
  • Pinch dried thyme
  • Handful grated Parmesan
  • Handful parsley leaves, finely chopped
  • 1 tub shredded Asiago cheese, 8 ounces (or shredded mozzarella)

Directions:

First start by preheating your oven to 400 degrees.  You’re going to want to brush the dirt off of the mushrooms.  You can do this simply by taking a damp paper towel and gently wiping them off.  After they are cleaned, carefully pop the stems out of each cap, creating a cavity that will hold your artichoke mixture.  Place the caps in a large bowl and drizzle in your olive oil to evenly coat the mushrooms, and then scatter them round-side-up onto a cookie sheet.  Roast these guys for about 10 minutes.  After you pull them out, season the caps with salt and pepper and flip over.  Place the pan aside while you prepare the stuffing.

Drain your cans of artichokes and then chop them into smaller pieces to make them easier to eat and easier to fit into the caps.  Using the same bowl as before, toss the artichokes with a drizzle of olive oil, garlic, thyme, grated Parmesan cheese, and parsley.  One the mixture is evenly incorporated, generously fill the mushroom caps, mounding the filling up.  Top the artichoke mixtures with the shredded Asiago/mozzarella cheese.  Return the pan to the oven and cook the mushrooms for another 5 minutes or until the cheese has melted and the filling has set.  As soon as they look beautiful and gooey, pull them out and set aside to cool only for a minute or so.  Once they reach the temperature where they won’t burn your tongue off, they are all set and ready to eat.

These stuffed mushrooms are such a wonderful appetizer for any meal, party, holiday, etc.  It helps that they are also extremely easy to make.  Even if you aren’t a huge mushroom fan, I highly suggest giving them a shot.  Another great thing about these little guys, is that they heat up incredibly!  I know that the idea of re-heating a stuffed mushroom sounds a bit odd, but trust me.. if you have any leftovers, just throw them on a pan and bake them in the oven for about 5 minutes at 400 degrees or even simply throw them in the microwave for about 2 minutes.  Either way comes out equally delicious.   This recipe has always proven to be a crowd favorite for me and I hope you enjoy them as much as I do!


It’s Time to Get Grillin’

Beautiful, sunny weather calls for nothing other than a delicious dinner off the grill.  Grilling is one of my all time favorite ways to cook food and with the temperatures beginning to rise back up, I am taking full advantage of every opportunity to fire up that BBQ.  Besides a giant, thick, juicy steak of course… chicken is one of my favorite things to grill up.  Grilled chicken is an easy and affordable dinner that leaves a ton of room for creativity and is sure to make your taste buds happy.  In this particular recipe, I did a simple marinade on the chicken and paired it up with some delicious sides.  Let’s jump right in!

Ingredients:

  • Chicken Breasts
  • Chiavetta’s marinade
  • Potatoes (medium-large size)
  • Zucchini
  • Squash
  • Olive oil/Basting oil
  • Salt and Pepper
  • Toppings for Baked Potatoes (Butter, Sour Cream, Cheddar Cheese, Bacon Bits, Chives, etc.)

Directions:

You’re going to want to start by marinading your chicken the night before you are planning on grilling it, to ensure you get LOADS of flavor.  What I do, is put the chicken breasts in a ziplock bag and pour in the Chiavetta’s until all of the meat is covered.  Let this rest in the fridge, flipping over every once in a while.  Now, when you’re ready to start cooking dinner, you’re going to want to get your potatoes cooking before anything else because these are going to take the longest to cook.  Preheat your oven to 450 degrees.  Rinse off your potatoes, pat dry, and wrap them tightly in tin foil.  Pop these guys on a cookie sheet and throw them in the oven.  Set your timer for 20-25 minutes to check on them; however, you’re most likely going to cook them for another 10 or so.  While these are cooking, you can begin chopping up your zucchini and squash to whatever size you desire.  Place these in a casserole dish and drizzle with olive oil.  Sprinkle with salt and pepper and pop them in the oven after the potatoes have been cooking for about 10 minutes.  Stir the veggies often.  They should take about 20 minutes to cook through.

While everything else is in the oven cooking, its time to fire up the grill.  I like to keep my grill on about medium heat when cooking chicken so that it doesn’t cook the outside too fast without evenly cooking the inside as well.  This tends to lead to a burnt chicken with a raw middle… NO GOOD!  So cook these babies low and slow.  The time definitely depends on the thickness of your meat.  My chicken breasts were approximately 3/4 inch in thickness, which took about 20 minutes to cook through.  Once you throw them on, don’t forget to keep checking them.  Another tip would be to try and not flip them over until the one side is fully cooked.  This helps contain the juices of the meat and help prevent the meat from drying out.  Don’t forget to check up on your potatoes and veggies.  To see if your baked potatoes are done, simply take a kitchen fork and stick it.  If the fork feels as though it is sliding in easily and the potato is no longer tough, then those guys are good to go and ready to eat.  But be warned, they will most likely be extremely hot.  Everything is timed out pretty well for your potatoes to have some cooling time, while your chicken finishes up on the grill.  If you think your chicken might be done, I recommend slicing into the thickest piece just to ensure that you no longer see pink, raw chicken in the middle.  Eating raw chicken can make you extremely sick, so definitely be careful.

When everything is all set and ready to go, it is time to dive right in.  Throw some chicken, veggies, and a baked potato on a plate and get ready to be happily surprised at how delicious this easy and quick meal turns out to be.  I personally enjoy eating my baked potatoes slathered in butter, sour cream, cheddar cheese, and hot sauce.  This clearly isn’t the healthiest thing in the word.. but DAMN is it delicious.

Another thing I wanted to mention, is that the baked potatoes and veggies can be cooked on the grill as well.  I have a very small grill so my space was much too limited, which is why I chose to use the oven.  If you decide to grill everything together, just wrap your potatoes in foil the same as before and put them directly on the grill.  The veggies you can put in a pan (one you don’t mind burning a little on the bottom), and throw those right on the grill as well.  If you decide to do this, try and keep the cover closed as much as possible to contain as much heat as possible.  Just remember, that this method does take slightly more time!

Also, as I said before, grilling is a method that opens you up to a WORLD of possibilities.  Don’t be afraid to try different marinades, or even a simple spice, or salt and pepper.  You can also try and experiment with different vegetables, like carrots, peppers, mushrooms, onions, etc.  All of these can be roasted using the same technique as I stated before.  Feel free to get creative without me. 🙂  One of the best parts about grilling, is that everything turns out delicious… unless you burn it of course… hahaha!  I hope you enjoy this beautiful weather and feel inspired to create some amazing meals along with it!

Spinach and Artichoke Dip

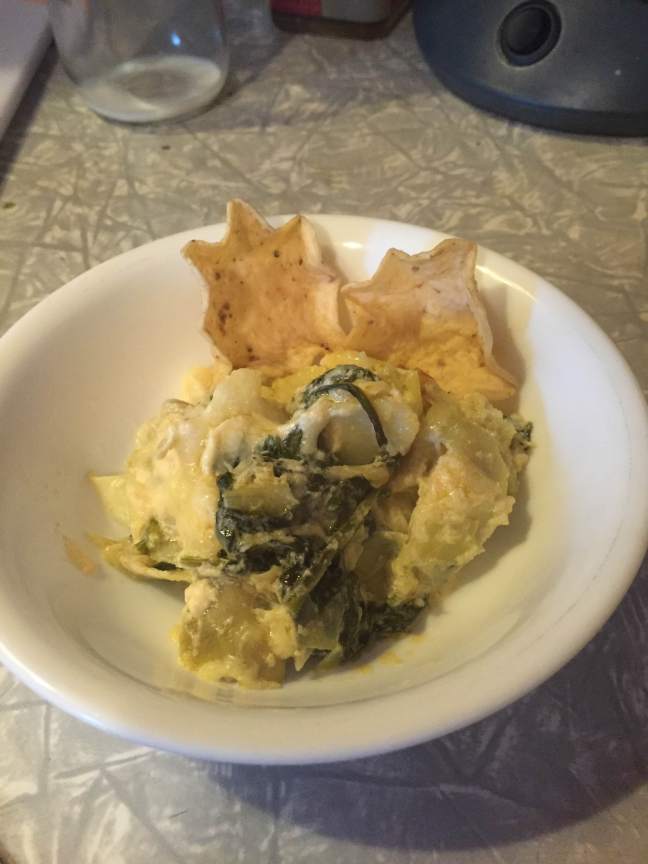
Although I’m a born and raised Buffalo Chicken Wing dip girl, Spinach and Artichoke dip definitely comes out as a close second.  I don’t know what it is about artichokes, but DAMN.. I can eat those things all day everyday, especially in this delicious dip.  If you’re a fan of Applebee’s Spinach and Artichoke appetizer dip, you’ll love this recipe!  Not only does it taste the same, but it’s healthier and very easy to make, while also being cheap and affordable.  This dip is sure to be a favorite at the next tailgate, dinner party, or even just a night in with friends.  Let’s get started shall we?!

Ingredients:

  • 8 cups fresh spinach
  • 1 clove garlic, minced (or about 1/2 tablespoon of jarred chopped garlic)
  • 1 lemon, zest finely grated
  • 2 (14-ounce) cans artichoke hearts, drained and coarsely chopped
  • 6 ounces (about 1 1/2 cups) Parmesan, freshly grated, divided
  • 3/4 cup shredded mozzarella cheese
  • 3/4 cup sour cream
  • 3/4 cup mayonnaise
  • 1 tablespoon hot sauce (Frank’s of course)
  • Salt and Pepper
  • Tortilla or pita chips for dipping

Directions:

Get that oven heated up to 375 degrees and grab a medium sized casserole dish to bake the dip in, set aside.  Next, grab a pot and boil some water.  While the water is boiling, you can begin draining and chopping the artichoke hearts, zesting the lemon, and chopping up the garlic.  By the time you’re done, your pot of water should be boiling.  Slowly begin to drop all of your spinach into the pot.  Stir around the boiling water until all of the spinach is wilted (this will only take about 30 seconds).  Now, you’ll wanna drain your spinach into a colander and squeeze out as much moisture as you can by pressing it down with a paper towel.  In a medium size bowl, mix together the spinach, garlic and lemon zest.  To this mixture, add the artichoke hearts, 1 cup Parmesan, 1/2 cup mozzarella, sour cream, mayonnaise, and hot sauce.  Combine together.  Scoop into your baking dish and pop in the oven for approximately 30 minutes or until the dip is all bubbling together.  For the last 5 minutes, pull the dip out and sprinkle the remaining 1/2 cup Parmesan and 1/2 cup mozzarella over the top.  Bake until the cheese is melted and bubbly.  When all done, pull out of the oven and serve hot with pita/tortilla chips.

I LOVE Tostitos scoops.  They are so perfect for eating every dip, especially this one.  If you’re feeling healthy, try out the multi-grain.  Another great thing about this dip is how great it re-heats.  Either heat up the oven and pop it back in for about 10 minutes or throw it in a bowl in the microwave for about a minute, it will still come out just as scrumptious.  I know you’re going to love this recipe so much you won’t even want to share.  But seriously, if you do decide to give your friends a taste… what’s better than a cheap, easy, and delicious recipe to leave them all impressed with your skills in the kitchen.

Stay tuned for more fun, easy, and delicious recipes coming your way. 🙂

Homemade Pepperjack Mac

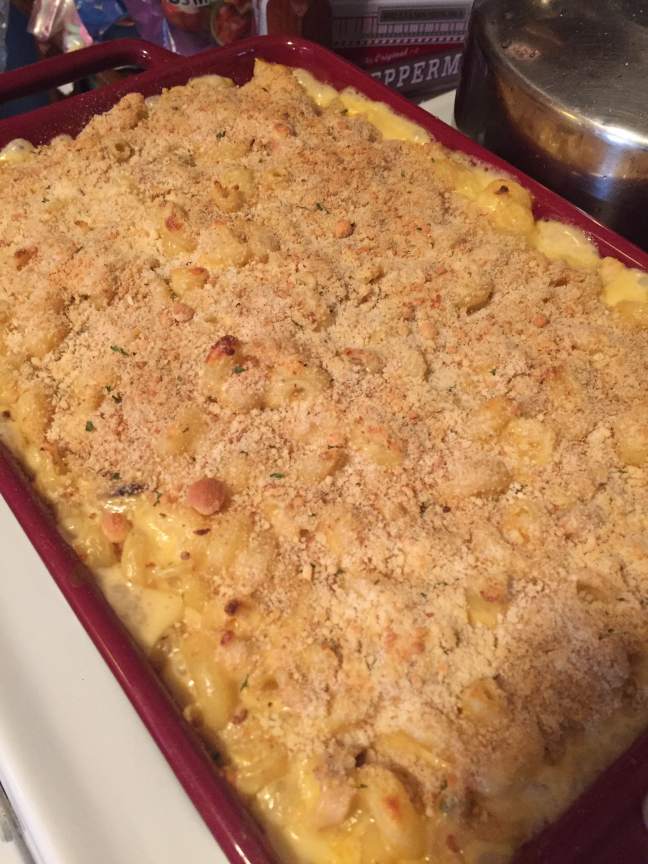
What’s better than a heaping bowl of your favorite comfort food after a longgggg day of classes?  That’s right, NOTHING is better than indulging in some delicious mac and cheese to make you feel at home.  This recipe definitely gives your traditional mac and cheese a fun and easy twist.  I am a huge fan of spicy foods, so I threw a bit of pepperjack cheese into this dish to kick it up a notch.  This is sure to be a recipe that you and all of your housemates will enjoy.  Let’s get started…

Ingredients: (remember, all amounts depend on how many mouths you are feeding)

  •  1 box of Pasta (I prefer Cavatappi because it holds onto the cheese so much better)
  • Pepperjack cheese
  • Velveeta cheese
  • Rotisserie Chicken (or cooked chicken breast)
  • Bread crumbs
  • Grated Parmesan cheese
  • Milk
  • Salt

Directions:

Preheat your oven to 350 degrees.  Grab a decent size pot and get some water boiling with a pinch of salt.  While your pasta is cooking in the boiling water, begin slicing your pepperjack and velveeta cheese into small cubes (enough to cover the pasta evenly).  I prefer putting a tad more pepperjack than velveeta personally, but it’s all up to you.  Also, you can begin to shred up your chicken.  When your pasta is cooked and strained, begin to melt your cheese in the same pot, slowly adding milk as needed.  Add your pasta to the pot.  Stir until evenly coated (will be very thick) and add more cheese and milk to your liking.  Mix in your shredded chicken.  Spread into a baking dish and coat the top with bread crumbs and grated parmesan cheese.  Pop into the oven and bake for approximately 15 minutes or until the cheese begins to bubble on the sides.  Pull the dish out of the oven and let cool until the mac lowers to a temp that won’t burn your mouth!  Scoop into some bowls and enjoy!

I LOVE adding just a touch of Frank’s hot sauce to give my pepperjack mac a tad more of a kick. 🙂  This is a fun, cheap, and easy recipe that will be sure to wow your friends.  Mac and cheese ALWAYS has a way of making my stomach smile and I hope this recipe will do the same for you!  Don’t be afraid to spice things up a bit.

P.S. if you ever have any leftovers (which you most likely won’t because it’s so delicious, you won’t be able to stop eating), just add a touch of milk and pop it in the microwave, stirring every 30 seconds.  It’ll come out just as yummy as it was when you first made it.


Baked Kale Chips

What’s a delicious and surprisingly healthy snack you ask?  Why Kale Chips of course!  I know what you’re all thinking.. “ewwwww kale, healthy, gross”… NO!  I thought the exact same thing the first time my roommate introduced me to this recipe, but boy it sure is easy and scrumptious.  The best part about this recipe, besides the obvious fact that it is yummy in the tummy, is that it leaves you feeling great.  Although we all love those greasy, fried potato chips, these kale chips are a wonderful substitute that leave you equally satisfied.

Alright, so I started out by grabbing a 16 oz. bag of chopped kale for only $2.88 at Walmart.  See, I told you my recipes were going to be easy and affordable.  The only other ingredients you will need for this recipe are olive oil and salt.

Ingredients:

  • Chopped kale (amount is determined by how hungry you are, but I always prefer the BIG bag)
  • Olive Oil
  • Sea Salt

Directions:

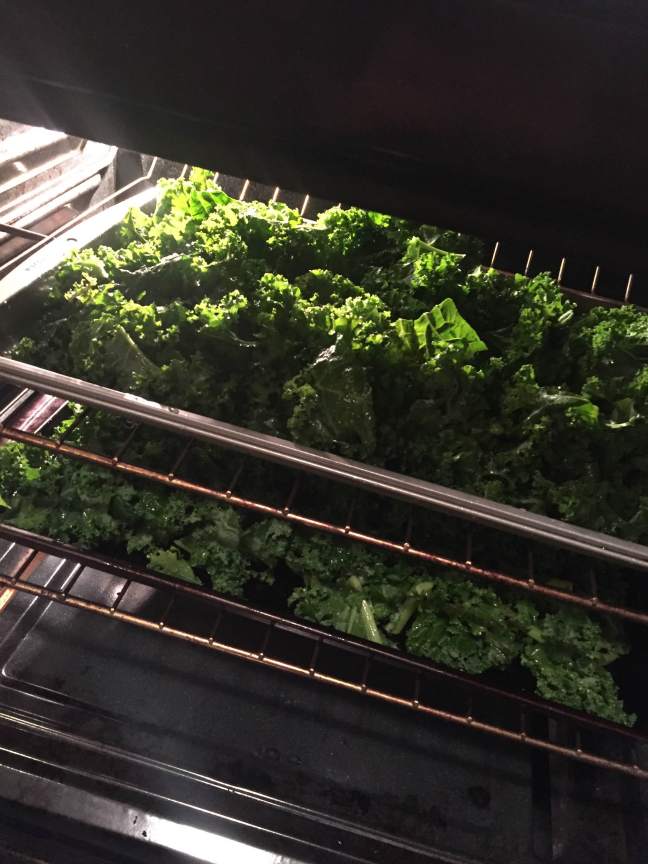
First, you’re going to want to preheat your oven to 350 degrees.  Now depending on how much kale you purchased, grab either one or two cookie/baking sheets.  Evenly distribute the kale on the baking sheets, tearing apart the large pieces.  Drizzle the olive oil over the kale until evenly coated.  Using your hands or a kitchen utensil (such as tongs), toss the kale in the olive oil to ensure that each piece is covered.  Next, liberally sprinkle salt over the kale (the more the better!).  Once seasoned, pop the pans in the oven.

Online, many recipes will recommend that you bake the kale for up to 45 minutes; however, my ancient oven cooks in record time so it only takes about 15 minutes.  What I’m trying to say, is to make sure you keep an eye on these delicious greens to ensure that they don’t burn on you (it’s easier than you think).  I recommend tossing them around every 5 minutes or so.  As soon as they start to wilt down and crisp up, they are 100% ready for you to enjoy.  Throw these guys in a bowl or eat them right off the pan, either way they are fantastic and you won’t be able to stop eating… but don’t worry, they’re very good for you.

I hope you enjoy this quick, easy, and affordable recipe.  I’ve got a bowl of kale chips right next to me that I cannot wait to dive into!